> ## Documentation Index
> Fetch the complete documentation index at: https://docs.moneydevkit.com/llms.txt
> Use this file to discover all available pages before exploring further.
# Merch Store
> Build a merch store that sells an AI-designed t-shirt over Lightning and fulfills orders by paying a print-on-demand supplier over L402.
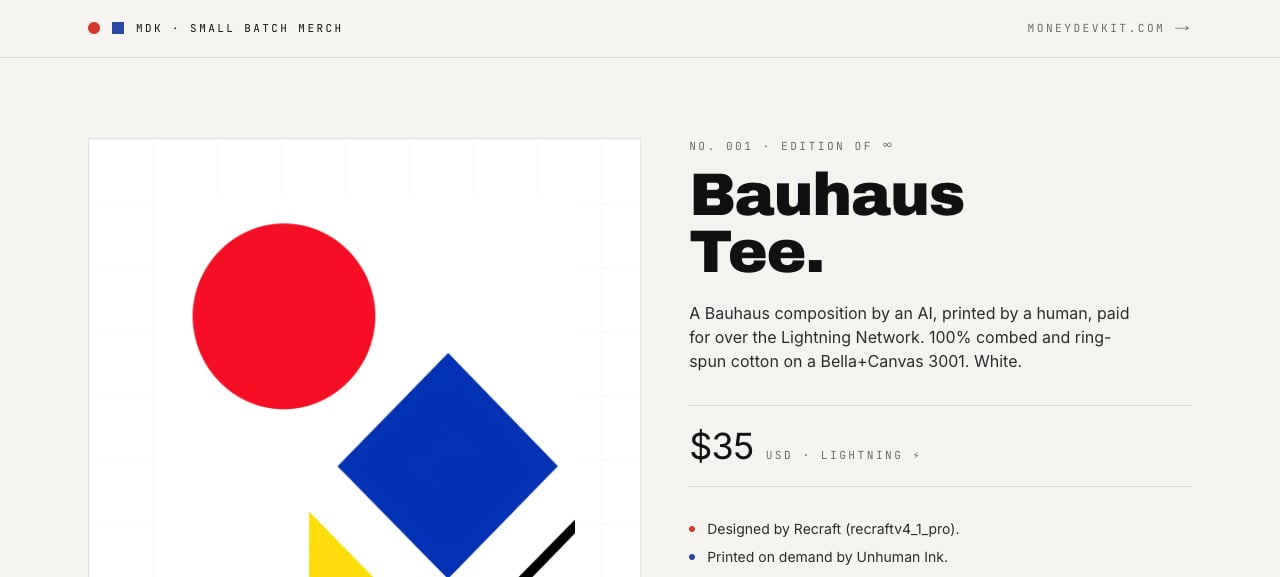 See the live example: [mdk-merchstore-example.vercel.app](https://mdk-merchstore-example.vercel.app)
This is an example for building a merch store with moneydevkit. We'll sell a single physical product — an AI-designed t-shirt — for a fixed price over the Lightning Network. This example is different from the others: it involves a real physical product and a real outbound payment on every sale. When a customer pays, the store programmatically pays a print-on-demand supplier over L402 to produce and ship the shirt, and keeps the spread between the retail price and the production cost.
## Step 1: Install the MCP server
The MCP server lets your coding agent connect to your existing moneydevkit account and wire up your app for you. Pick your coding agent below:
Install MCP in Cursor
Install MCP in VS Code
Run this in your project directory:
```bash theme={null}
claude mcp add moneydevkit --transport http https://mcp.moneydevkit.com/mcp/account/
```
Run this in your project directory:
```bash theme={null}
codex mcp add moneydevkit --url https://mcp.moneydevkit.com/mcp/account/
```
## Step 2: Start a new project
Create an empty folder and open it in your coding agent. This will be the root of your new Next.js project.
## Step 3: Prompt your coding agent
Paste the following prompt into your coding agent to scaffold the merch store. Note that the build has a couple of paid steps (generating the artwork and creating the product cost roughly $0.25–$0.50 total), so your agent will pause and ask you to fund its agent wallet with a few dollars of bitcoin before it proceeds.
The goal is to build a Next.js (App Router) merch store that sells a single physical product — an AI-designed t-shirt — for a fixed price over the Lightning Network using moneydevkit, and fulfills each order automatically by paying a print-on-demand service over L402. This exercises moneydevkit [checkout](https://docs.moneydevkit.com/nextjs.md), [programmatic payouts + L402/pay402](https://docs.moneydevkit.com/l402.md), the [agent wallet](https://docs.moneydevkit.com/agent-wallet.md), and [webhooks](https://docs.moneydevkit.com/webhooks.md). Read the docs index first at [https://docs.moneydevkit.com/llms.txt](https://docs.moneydevkit.com/llms.txt) and the linked pages before you start.
Business model: the customer pays a retail price (e.g. $35) to the store via moneydevkit checkout. When that payment settles, the store programmatically pays the print supplier the production cost + shipping (well under $35) over L402, and keeps the spread. Do not hardcode the supplier price — discover it from the supplier's catalog at build time.
Keep it simple: there is no need to create a matching product in the moneydevkit dashboard. Use an AMOUNT-type checkout for the fixed retail price (details in phase 4). The only product that has to exist is the one at the print supplier; the storefront just charges a flat price and there is no 1:1 mapping to maintain between an unhuman.ink product and a moneydevkit product.
Build it in these phases:
1. Agent wallet. Install and initialize the moneydevkit agent wallet (`npx @moneydevkit/agent-wallet@latest`). You will use it to pay the L402 invoices for design generation and product creation. Check the balance first; if it is too low, STOP and tell the user to fund the wallet with a small amount of bitcoin (CashApp, Strike, or any Lightning wallet) — creating the product costs roughly $0.25–$0.50 total, so ask for a few dollars of headroom. Do not proceed to any paid step with an empty wallet.
2. Get the artwork. By default, generate it yourself the first time: fetch [https://unhuman.design/llms.txt](https://unhuman.design/llms.txt) and follow its documented API exactly to generate a print-ready artwork image, paying any L402 challenge with the agent wallet. But if the user has provided their own artwork (a file they point you at, a path, or a URL), use that instead of generating one — only generate when no artwork is supplied. Either way, save the chosen image locally (the store's `assets/`) and use it on the marketing page. If unhuman.design's flow differs from what you expect, trust its llms.txt over assumptions.
3. Create the product with unhuman.ink. Fetch [https://unhuman.ink/llms.txt](https://unhuman.ink/llms.txt) and follow it exactly. The flow is: GET the catalog and pick a 100% cotton t-shirt template (note: some colors are cotton/poly heather blends — pick a solid color that is 100% cotton) → POST `/api/artworks/challenge` (L402, pay with agent wallet) to get an `upload_token` → POST `/api/artworks` (Bearer upload\_token, multipart) to stage the artwork → POST `/api/products` (L402) to create the product. CRITICAL PRICING: unhuman.ink charges the store the product's `retail_price` on every order, so set `retail_price` equal to the catalog production cost (no markup on their side) — that is what lets the store keep the spread against the \$35 checkout price. After creation, you MUST save the returned `product_uuid`, `bearer_token`, and `product_url` to `~/.unhuman/ink/products.json` (append to the array; the bearer token is shown only once). Then GET `/api/products/{product_uuid}` and record the variant's `sync_variant_id` — this is DIFFERENT from the catalog `catalog_variant_id` and is the id you must use when placing orders.
4. Next.js + moneydevkit checkout. Follow [https://docs.moneydevkit.com/nextjs.md](https://docs.moneydevkit.com/nextjs.md) to install `@moneydevkit/nextjs` and add the `/api/mdk` operational route. Build the storefront as a single product page with a size picker and a shipping-address form. Start the checkout with `createCheckout` as an AMOUNT-type checkout for the fixed retail price (title/description set in code) — do NOT use a PRODUCTS checkout and do NOT require a moneydevkit dashboard product. Confirm the exact amount/currency options for AMOUNT checkouts in nextjs.md (e.g. whether the amount is fiat like USD or denominated in sats) and use whatever it supports for a fixed \$35-equivalent price. moneydevkit checkout metadata is validated as a flat string map (`z.record(z.string())`), so JSON-stringify any nested object (like the shipping address) before putting it in metadata, and parse it back on the server. Set `productKind: "shirt"` (or similar) in metadata so the fulfillment handler can tell real orders apart.
5. Programmatic fulfillment. Add a `checkout.completed` notification webhook route (e.g. `/api/webhooks/checkout-completed`) that: verifies the Standard-Webhooks signature with the webhook secret; reads the shipping address and product kind from the checkout metadata; and calls `pay402("https://unhuman.ink/api/orders", ...)` with the product UUID, the `sync_variant_id`, quantity, recipient, a `maxAmountSats` cap, and an idempotency key derived from the checkout id. pay402 handles the L402 loop (initial POST → 402 → programmatic payout of the invoice → replay with the token). Set `maxAmountSats` above the real order cost (production cost + shipping — query unhuman.ink's free `/api/shipping` endpoint to size it) with headroom for exchange-rate movement, but comfortably below the retail price so every order stays profitable. On any failure, return a 5xx so moneydevkit retries the delivery; the idempotency key prevents double-paying on retries.
6. Marketing / agent-readiness. Give the store a polished storefront and an `llms.txt` describing the product so an agent could buy it. Follow Cloudflare's agent-readiness guidance ([https://isitagentready.com/](https://isitagentready.com/)).
Things to get right (these are the failure modes that break this in production):
* The `UNHUMAN_VARIANT_ID` you order with must be the product's `sync_variant_id` from GET `/api/products/{uuid}`, NOT the catalog `catalog_variant_id`. Ordering with the catalog id is rejected ("variant does not belong to this product").
* The `UNHUMAN_PRODUCT_UUID` and `UNHUMAN_VARIANT_ID` values you generate at build time live only in your local `.env.local`. They are NOT on the deploy target until the user adds them. The fulfillment handler must fail loudly (clear error) if either is missing, rather than silently doing nothing.
* Use environment variables for the product UUID, sync variant id, moneydevkit access token/mnemonic, and the webhook secret. Never commit secrets.
When you finish, tell the user exactly what they must do on their end: enable programmatic payouts on their moneydevkit app (the switch is on the dashboard's Payouts page — [https://docs.moneydevkit.com/dashboard/payouts.md](https://docs.moneydevkit.com/dashboard/payouts.md)); configure a `checkout.completed` notification webhook pointing at `/api/webhooks/checkout-completed` and copy the signing secret into `MDK_WEBHOOK_SECRET`; add all the environment variables to their deployment and redeploy; and keep the `checkout.completed` webhook enabled (moneydevkit auto-disables an endpoint after repeated failed deliveries). Then give them a local preview link.
## Step 4: Preview and deploy
When your coding agent finishes, you can preview your app. The agent will give you a link that you can open in your browser to preview the app locally. When you're ready to ship it, head to [Vercel](https://vercel.com/new) to deploy.
Because this store pays a supplier on every sale, a few things have to be wired up by you (your agent can't do these on your behalf):
1. **Create a moneydevkit app** (or connect your existing one via the MCP) and copy `MDK_ACCESS_TOKEN` and `MDK_MNEMONIC`.
2. **[Enable programmatic payouts](/dashboard/payouts#programmatic-payouts)** — the switch is on the Payouts page of the dashboard. The store pays the supplier out of its balance on every sale; each app has a rolling daily programmatic payout limit, so make sure it comfortably covers your expected order volume. There's no dashboard product to create; the store uses an AMOUNT-type checkout for the fixed price.
3. **Configure a `checkout.completed` notification webhook** pointing at `https://YOUR_HOST/api/webhooks/checkout-completed`, and copy its signing secret into `MDK_WEBHOOK_SECRET`. Point it at your production alias, not a one-off immutable deployment URL.
4. **Add the environment variables to your deployment**: `UNHUMAN_PRODUCT_UUID`, `UNHUMAN_VARIANT_ID` (the sync variant id), `MDK_ACCESS_TOKEN`, `MDK_MNEMONIC`, and `MDK_WEBHOOK_SECRET` — then **redeploy**. Environment changes don't apply to a running deployment until you redeploy.
5. **Keep the `checkout.completed` webhook enabled.** moneydevkit auto-disables an endpoint after a streak of failed deliveries, so if early orders fail while you finish wiring things up, the webhook can silently switch off. Re-enable it and confirm one delivery returns 200 so it stays on.
See the live example: [mdk-merchstore-example.vercel.app](https://mdk-merchstore-example.vercel.app)
This is an example for building a merch store with moneydevkit. We'll sell a single physical product — an AI-designed t-shirt — for a fixed price over the Lightning Network. This example is different from the others: it involves a real physical product and a real outbound payment on every sale. When a customer pays, the store programmatically pays a print-on-demand supplier over L402 to produce and ship the shirt, and keeps the spread between the retail price and the production cost.
## Step 1: Install the MCP server
The MCP server lets your coding agent connect to your existing moneydevkit account and wire up your app for you. Pick your coding agent below:
Install MCP in Cursor
Install MCP in VS Code
Run this in your project directory:
```bash theme={null}
claude mcp add moneydevkit --transport http https://mcp.moneydevkit.com/mcp/account/
```
Run this in your project directory:
```bash theme={null}
codex mcp add moneydevkit --url https://mcp.moneydevkit.com/mcp/account/
```
## Step 2: Start a new project
Create an empty folder and open it in your coding agent. This will be the root of your new Next.js project.
## Step 3: Prompt your coding agent
Paste the following prompt into your coding agent to scaffold the merch store. Note that the build has a couple of paid steps (generating the artwork and creating the product cost roughly $0.25–$0.50 total), so your agent will pause and ask you to fund its agent wallet with a few dollars of bitcoin before it proceeds.
The goal is to build a Next.js (App Router) merch store that sells a single physical product — an AI-designed t-shirt — for a fixed price over the Lightning Network using moneydevkit, and fulfills each order automatically by paying a print-on-demand service over L402. This exercises moneydevkit [checkout](https://docs.moneydevkit.com/nextjs.md), [programmatic payouts + L402/pay402](https://docs.moneydevkit.com/l402.md), the [agent wallet](https://docs.moneydevkit.com/agent-wallet.md), and [webhooks](https://docs.moneydevkit.com/webhooks.md). Read the docs index first at [https://docs.moneydevkit.com/llms.txt](https://docs.moneydevkit.com/llms.txt) and the linked pages before you start.
Business model: the customer pays a retail price (e.g. $35) to the store via moneydevkit checkout. When that payment settles, the store programmatically pays the print supplier the production cost + shipping (well under $35) over L402, and keeps the spread. Do not hardcode the supplier price — discover it from the supplier's catalog at build time.
Keep it simple: there is no need to create a matching product in the moneydevkit dashboard. Use an AMOUNT-type checkout for the fixed retail price (details in phase 4). The only product that has to exist is the one at the print supplier; the storefront just charges a flat price and there is no 1:1 mapping to maintain between an unhuman.ink product and a moneydevkit product.
Build it in these phases:
1. Agent wallet. Install and initialize the moneydevkit agent wallet (`npx @moneydevkit/agent-wallet@latest`). You will use it to pay the L402 invoices for design generation and product creation. Check the balance first; if it is too low, STOP and tell the user to fund the wallet with a small amount of bitcoin (CashApp, Strike, or any Lightning wallet) — creating the product costs roughly $0.25–$0.50 total, so ask for a few dollars of headroom. Do not proceed to any paid step with an empty wallet.
2. Get the artwork. By default, generate it yourself the first time: fetch [https://unhuman.design/llms.txt](https://unhuman.design/llms.txt) and follow its documented API exactly to generate a print-ready artwork image, paying any L402 challenge with the agent wallet. But if the user has provided their own artwork (a file they point you at, a path, or a URL), use that instead of generating one — only generate when no artwork is supplied. Either way, save the chosen image locally (the store's `assets/`) and use it on the marketing page. If unhuman.design's flow differs from what you expect, trust its llms.txt over assumptions.
3. Create the product with unhuman.ink. Fetch [https://unhuman.ink/llms.txt](https://unhuman.ink/llms.txt) and follow it exactly. The flow is: GET the catalog and pick a 100% cotton t-shirt template (note: some colors are cotton/poly heather blends — pick a solid color that is 100% cotton) → POST `/api/artworks/challenge` (L402, pay with agent wallet) to get an `upload_token` → POST `/api/artworks` (Bearer upload\_token, multipart) to stage the artwork → POST `/api/products` (L402) to create the product. CRITICAL PRICING: unhuman.ink charges the store the product's `retail_price` on every order, so set `retail_price` equal to the catalog production cost (no markup on their side) — that is what lets the store keep the spread against the \$35 checkout price. After creation, you MUST save the returned `product_uuid`, `bearer_token`, and `product_url` to `~/.unhuman/ink/products.json` (append to the array; the bearer token is shown only once). Then GET `/api/products/{product_uuid}` and record the variant's `sync_variant_id` — this is DIFFERENT from the catalog `catalog_variant_id` and is the id you must use when placing orders.
4. Next.js + moneydevkit checkout. Follow [https://docs.moneydevkit.com/nextjs.md](https://docs.moneydevkit.com/nextjs.md) to install `@moneydevkit/nextjs` and add the `/api/mdk` operational route. Build the storefront as a single product page with a size picker and a shipping-address form. Start the checkout with `createCheckout` as an AMOUNT-type checkout for the fixed retail price (title/description set in code) — do NOT use a PRODUCTS checkout and do NOT require a moneydevkit dashboard product. Confirm the exact amount/currency options for AMOUNT checkouts in nextjs.md (e.g. whether the amount is fiat like USD or denominated in sats) and use whatever it supports for a fixed \$35-equivalent price. moneydevkit checkout metadata is validated as a flat string map (`z.record(z.string())`), so JSON-stringify any nested object (like the shipping address) before putting it in metadata, and parse it back on the server. Set `productKind: "shirt"` (or similar) in metadata so the fulfillment handler can tell real orders apart.
5. Programmatic fulfillment. Add a `checkout.completed` notification webhook route (e.g. `/api/webhooks/checkout-completed`) that: verifies the Standard-Webhooks signature with the webhook secret; reads the shipping address and product kind from the checkout metadata; and calls `pay402("https://unhuman.ink/api/orders", ...)` with the product UUID, the `sync_variant_id`, quantity, recipient, a `maxAmountSats` cap, and an idempotency key derived from the checkout id. pay402 handles the L402 loop (initial POST → 402 → programmatic payout of the invoice → replay with the token). Set `maxAmountSats` above the real order cost (production cost + shipping — query unhuman.ink's free `/api/shipping` endpoint to size it) with headroom for exchange-rate movement, but comfortably below the retail price so every order stays profitable. On any failure, return a 5xx so moneydevkit retries the delivery; the idempotency key prevents double-paying on retries.
6. Marketing / agent-readiness. Give the store a polished storefront and an `llms.txt` describing the product so an agent could buy it. Follow Cloudflare's agent-readiness guidance ([https://isitagentready.com/](https://isitagentready.com/)).
Things to get right (these are the failure modes that break this in production):
* The `UNHUMAN_VARIANT_ID` you order with must be the product's `sync_variant_id` from GET `/api/products/{uuid}`, NOT the catalog `catalog_variant_id`. Ordering with the catalog id is rejected ("variant does not belong to this product").
* The `UNHUMAN_PRODUCT_UUID` and `UNHUMAN_VARIANT_ID` values you generate at build time live only in your local `.env.local`. They are NOT on the deploy target until the user adds them. The fulfillment handler must fail loudly (clear error) if either is missing, rather than silently doing nothing.
* Use environment variables for the product UUID, sync variant id, moneydevkit access token/mnemonic, and the webhook secret. Never commit secrets.
When you finish, tell the user exactly what they must do on their end: enable programmatic payouts on their moneydevkit app (the switch is on the dashboard's Payouts page — [https://docs.moneydevkit.com/dashboard/payouts.md](https://docs.moneydevkit.com/dashboard/payouts.md)); configure a `checkout.completed` notification webhook pointing at `/api/webhooks/checkout-completed` and copy the signing secret into `MDK_WEBHOOK_SECRET`; add all the environment variables to their deployment and redeploy; and keep the `checkout.completed` webhook enabled (moneydevkit auto-disables an endpoint after repeated failed deliveries). Then give them a local preview link.
## Step 4: Preview and deploy
When your coding agent finishes, you can preview your app. The agent will give you a link that you can open in your browser to preview the app locally. When you're ready to ship it, head to [Vercel](https://vercel.com/new) to deploy.
Because this store pays a supplier on every sale, a few things have to be wired up by you (your agent can't do these on your behalf):
1. **Create a moneydevkit app** (or connect your existing one via the MCP) and copy `MDK_ACCESS_TOKEN` and `MDK_MNEMONIC`.
2. **[Enable programmatic payouts](/dashboard/payouts#programmatic-payouts)** — the switch is on the Payouts page of the dashboard. The store pays the supplier out of its balance on every sale; each app has a rolling daily programmatic payout limit, so make sure it comfortably covers your expected order volume. There's no dashboard product to create; the store uses an AMOUNT-type checkout for the fixed price.
3. **Configure a `checkout.completed` notification webhook** pointing at `https://YOUR_HOST/api/webhooks/checkout-completed`, and copy its signing secret into `MDK_WEBHOOK_SECRET`. Point it at your production alias, not a one-off immutable deployment URL.
4. **Add the environment variables to your deployment**: `UNHUMAN_PRODUCT_UUID`, `UNHUMAN_VARIANT_ID` (the sync variant id), `MDK_ACCESS_TOKEN`, `MDK_MNEMONIC`, and `MDK_WEBHOOK_SECRET` — then **redeploy**. Environment changes don't apply to a running deployment until you redeploy.
5. **Keep the `checkout.completed` webhook enabled.** moneydevkit auto-disables an endpoint after a streak of failed deliveries, so if early orders fail while you finish wiring things up, the webhook can silently switch off. Re-enable it and confirm one delivery returns 200 so it stays on.